
To replace the defective Lenovo U400, my wife decided to get a different computer instead of having Lenovo ship us a new unit. We ended up purchasing a 13″ Macbook Pro from BestBuy. This being her first time owning and using a Mac, I had to help and teach her some of the basic features – using Finder, Command key, trackpad gestures, installing/uninstalling apps, etc.
Of the many questions, she had about using a Mac, one of the first questions she asked me was “how to take a screenshot on a Mac?“. I know there are a lot of people out there who are new Mac owners or some who simply don’t know how to take screenshots on a Mac so I decided to write this tutorial. Since my wife’s Macbook Pro came preinstalled with Mac OS X Lion, I’m gonna list down the steps on how to take a screenshot or do a screen capture on Mac OS X Lion.
There are two ways to take a screenshot or screen capture on Mac OS X Lion: using the Preview app or by using keyboard shortcuts.


Using the Preview app:
- If you already have the Preview app on your dock, just click on the icon to launch it.
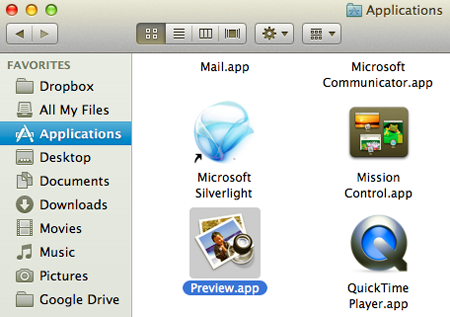
- If you don’t have it on your dock, you can access it via Finder > Applications. Launch app.
- With the Preview app running, on the toolbar click on File > Take ScreenShot.
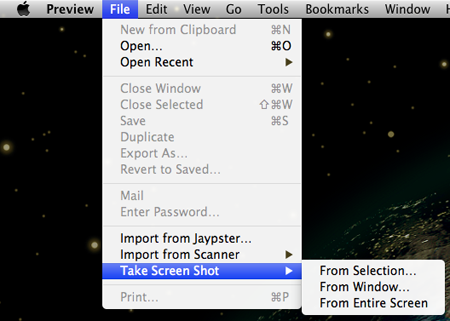
- Choose from 3 available options – From Selection, From Window, or From Entire Screen.
- Take your screenshot.
Using keyboard shortcuts:
- Command + Shift + 3 = takes a screenshot of the entire screen and saves it as an image file on the desktop.
- Command + Shift + 4 & then Select an area = takes a screenshot of the selected area and saves it as an image file on the desktop.
- Command + Shift + 4 & then click Space bar, click on a Window = takes a screenshot of selected window and saves it as an image file on the desktop.
- Command + Control + Shift + 3 = takes a screenshot of the entire screen and saves it to the clipboard.
- Command + Control + Shift + 4 & then Select an area = takes a screenshot of the selected area and saves it to the clipboard.
- Command + Control + Shift + 4 & then click Space bar, click on a Window = takes a screenshot of selected window and saves it to the clipboard.
NOTE: The Command key is the one on the left side of the Space bar with the Apple logo on it.
Taking screenshots or doing a screen capture on Mac OS X Lion is very easy once you know how to do it. Just remember that when using the keyboard shortcuts, make sure you press on all required keys (Command, Control, Shift, etc.) all at the same time and if you’re using the Select Area/Select Window option, don’t release the combination keys before you click on the Space bar or selecting a window. Btw, I used the keyboard shortcut method to take the screenshots for this tutorial.
Hope this short and simple tutorial helped you learn how to take screenshots on Mac OS X Lion. If you find it useful and helpful, please don’t forget to share it.


congrats on the new mac bai. What do you think about Lion OS?