

This is a guest post by Gemma Baltazar of The Lady Programmer. If you want to guest post on this blog, check out the guidelines here.
Since I got the chance to be given a free web host and host my own WordPress blog, I was jumping up and down with joy. I would finally get to have my own self-hosted WordPress blog and have full control over the way that I want to with my own blog!
Requirements Needed Before Moving from Blogger to WordPress


If you want to really make that move from Blogger to WordPress, you need to prepare for the following first:
- At least one backup of your Blogger blog. You might want to have two or more copies of the backup, just in case. Backup in blogger is done using Export Tool, and here’s How to Export an Existing Blog.
- A web host. Chances are you need to pay one to host your blog. There are those free services that are almost unreliable: they put your blog offline after getting a good traffic. Paid services are almost always a better way to host your blog. I use 1and1 to host my own freelance blog — if you are interested, you can sign up for an account with them).
- (optional) Own domain. Although your web host can give you their own subdomain, it is always better to have your own domain. Many paid web host services also offer free domain registration on their packages. Would you like readers to access a site named s12345.samplehost.com or the one with the name www.theladyprogrammer.com?
- (optional) A WordPress theme. You can use those default Kubrick and Classic themes that come with each WordPress installation or you can dress it up with a theme to make your blog look interesting. There are various WordPress theme reviews on this blog and you might want to choose from one of these. Make the decision early because there are many plugins that require theme modifications.
- (optional) A recent post announcing your move. If you have a huge reader base, it is often wise to post this announcement.
Step by Step Instructions on Moving Blogger to WordPress
Once that you have everything above prepared, you can now proceed with the step-by-step instructions I had outlined below:
Preparing your WordPress Blog
1. Get into your webhost’s Cpanel and install WordPress. Most web hosting services provide autoinstaller scripts like Fantastico which show wizard-type interfaces that are very easy to follow. If for some reason you really need to do a manual installation, there’s more on this WordPress.org’s documentation on Installing WordPress.
2. Upgrade your blog to the most recent version of WordPress, if you see the message below. Click “Please update now” just beside “WordPress 2.7.1 is available!” to start the upgrade process. This helps avoid security issues associated with WordPress blogs.

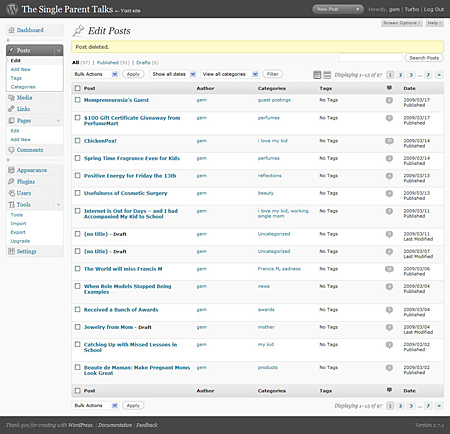
3. Clean up all the sample data in your new WordPress installation. Those sample data are: a post, a page, an approved comment and some blogroll links. You cannot remove “Uncategorized” category, so leave it as is.
Sample data generated after installing WordPress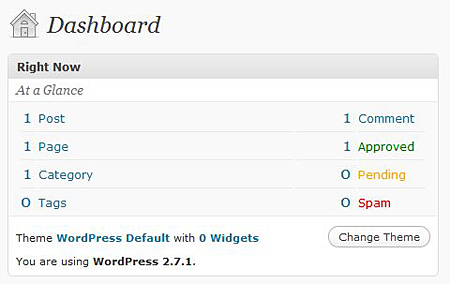
Sample blogroll links generated after installing WordPress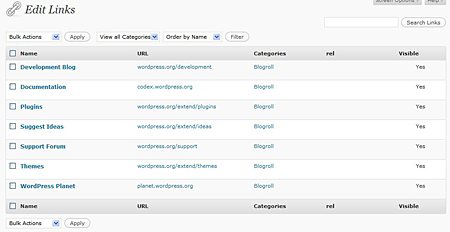
4. Set your WordPress blog’s Privacy Settings by going to Settings > Privacy, then select “I would like to block search engines, but allow normal visitors”. This setting is just temporary: it is to prevent duplicate content penalty in search engines, so your blog visitors from search engines can still easily visit your blog.
Importing the WordPress Blog
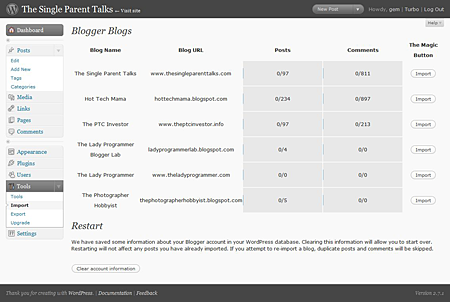
1. Go to Tools > Import then click Blogger to initiate the import from your Blogger blog. Click the Authorize and Grant Access when Google Access Request appears.
2. You will be asked to choose which blog to import posts and comments from. Click the Import button to start the process. This will take a while, depending on the length of your blog. If the import is done, the Import button changes to Set Author. Click Set Author.
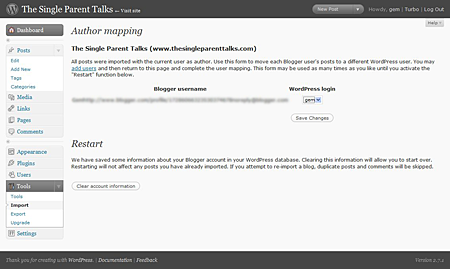
3. The next screen asks you to map the Blogger author to the WordPress author. This step is essential especially if you have a multi-authored blog. Since I am the only author of my Blogger blog, I just have to simply click Save Changes.
4. If the import is successful, you should be able to view all your posts and comments.
That’s it for Part 1 of HowTo: Move From Blogger to WordPress. Next week, we’ll continue this tutorial and Part 2 will talk about setting up the permalinks, setting up the blog’s appearance, setting up the custom domain and the rest of this comprehensive guide so watch out for it. If you don’t want to miss part 2, make sure you subscribe to JaypeeOnline’s RSS feed.
UPDATE: How To Move from Blogger to WordPress Part 2


thanks for this tutorial gemma, I always wondered how to do this, I’m planning to move my other blog to wordpress very soon, so this article saved me time. :D
how about installing the plug’ins? how?
This is one of the best tutorials I have seen out there. I am however stuck at one point, I am at the import stage and it is only importing 1/10 (I'm trying out a test blog first) and going on to set authors from there. What am I doing wrong?
@ step 2 in Importing the Blogger files… nothing is being imported :(
I am importing to a subdomain of my blog
Thank you Gemma for an excellent post – my export from blogger to wordpress went like a dream – thank you
@Janet – You're welcome! I'm really glad to hear that you find my post very useful. :-)
@jhay – I think I also created my Blogger account about the same time as you did although that time, I already know HTML and stuff. It was in blogging that I was a newbie. Hehe
Btw, I just got my Blogger account back and merged it to one of my Gmail accounts. Like what you did, I’m keeping it for old times sake. :D
@ Jaypee: That Blogger blog was started back in 2001, it was nothing more than a sandbox of sorts when I started to study HTML.
That old account was merged with my Gmail account so I can still access it anytime. Just for old times' sake, I suppose. ;)
@Raju – Thank you! Glad you liked it and thanks also for the stumble. Appreciate it. :)
Superb article. Very detailed and helpful for newbies. Great one! Stumbled :)
@Greg – Cross platform integration tool? That sounds very cool and interesting. Please do let us know when its already available. Thanks for sharing!
I have initiated a cross platform integration tool and it's still being tested but hopefully let you guys try it soon :)
@Misa – Good to know that you also found this tutorial useful. Thanks for the bookmark! :)
Very helpful indeed.. I’ve bookmarked it already.. Thanks..
@Badet – That’s great! Mind telling us which friend sent you the link to this tutorial so we could thank her? :)
Its good to have friends who can and will help you with these kind of stuff. For those who don’t have friends, then this post/tutorial will do. Hehe :D
A friend sent me this link. Great post! Good thing I have an online friend, pinaymommy, who guided me with my site's migration.
@Dexter – Thanks for the compliment and thanks for sharing! :)
@jan – Thanks for the bookmarks and tweets! Promoting and sharing this tutorial will help more bloggers who wish or plan to move from Blogger to WordPress because this procedure is a very daunting task for most of them. But with this simple step-by-step guide, the process becomes simplified.
@elmot – Yeah, you should have told us you were sick. We almost thought you already left blogging for good. Hehe
Great post, You might want to read my post about it http://techathand.net/2008/01/seo-friendly-way-of-moving-your-old-blogspot-blog-post/
@Dexter
Yup! I still have the second part of this post which is yet to be published – it's all about how to configure those permalinks. I was able to figure out how to properly declare those permalinks using just a single plugin. So I did not have to remove everything from Google's index then let the bot reindex the whole site again. :-)
Bookmarked and tweeted. Very thorough and clear, precise language at that, Gem. Nice!
Elmot: I thought you were still tired from last month's commenting. LOL. You were in sick bay pala. Gosh, you should have at least tweeted us about it. ",)
@Juanel – My experience with MT has been pretty good so far and much much better than what I had with DreamHost although, there’s been a few recent hiccups lately but nothing to be really concerned about.
I really can’t give you a specific answer. It all depends on how many sites you have and how much traffic each site generates.
Anyways, glad we could help you with this tutorial. You’re welcome! ;)
To Jaypee,
How is it so far for you under MediaTemple? I just availed of their GridService hosting. Will a move from Blogger to WP and crowd that MT hosting with several site, some with pretty good traffic, going to affect MT hosting?
BTW, this is what I am going to use (tutorial) if ever I decide to transfer several of my blog to MT. Thanks for this article.
@elmot – Yes, my friend. This is the post I was talking about. Thanks to you and jan for requesting a tutorial for moving from Blogger to WordPress. I do hope this tutorial will help make the transition easier for you and other bloggers who wish to move to a self-hosted WordPress blog. Btw, when do you plan to make the switch? :)
great post.. it is very helpful. Thanks for sharing Gem.
@Martin – Thanks for the compliments! Glad you liked the article and found it useful. Gem did a good job with it. Thank you for sharing your article, I’m sure someone will find that useful too.
Thanks for stopping by and joining the discussion. :)
Very helpful. I followed some of your tricks and learned a few of my own. I wrote this post about moving from Blogger to WordPress 2.7 using Godaddy Economy Hosting: http://ferrogate.com/2009/04/the-new-ferrogate-i-moved-from-blogger-to-wordpress.html . I managed to keep URLs intact without redirecting or doing any manual labor. Hope it’s useful to someone. I also talk about why WordPress is the more professional choice for blogging.
Thanks for a great blog, subscribing to it as we speak.
hahhaha! so jayps, this is it. great informative post… i am presently blogging under blogger and this post authored by gem is simply very very helpful for me when i move to a self-hosted blog under wordpress.
thanks for the post gem and jayps.
@jhay – Yes, this is the first ever guest post here on JaypeeOnline.
Oh, you started on Blogger too? I didn’t know that. We do have a lot things in common coz I also started on Blogger myself. I also wasn’t able to import my Blogger posts into WordPress but I do believe I republished a couple of those posts here. Btw, I haven’t logged in to my Blogger account in a long long time and I don’t remember the login details anymore. :D
I have blogs from both platforms but I haven't tried moving from one to another. The moving process seemed simpler than I thought, or it must be because of your clear step-by-step explanation.
Will bookmark this post as I'm planning to move one of my blogger blogs to wordpress when time permits. Very useful post you made here Gem.
@Frenchy
Thanks. Problems that are encountered during the Blogger-to-WordPress "import" makes it really complicated.
Nice, the first guest post I think? Congrats!
Well anyways, I started blogging on Blogger but never really knew what blogging was back then so it never really grew. Then I discovered WordPress and started to blog seriously so I never had the chance to importing my Blogger posts into WordPress.
What I did instead was configure my old Blogger blog to redirect to my new WordPress-powered blog.
@jhay
Not really my first post, I've guest blogged on other blogs. I am not sure if I am the very first guest blogger here. :-)
I was thinking of that, but then my blogger blog was the one that was already linked up to several blogs and freelance sites. I don't want to really leave readers behind.