
Last week, I installed a toolbar here on JaypeeOnline, its the toolbar located at the bottom of each page. Some of you might have noticed it already and some have even asked me about it, where I got it, how I installed it or is it a plugin?
The first time I saw this toolbar in action was at The Next Web blog and then saw it on some blogs/websites during my regular web surfing and blog hopping routines. Some of you might have also seen it on other blogs but don’t know what its called. The toolbar doesn’t have a name or credit source so I had to do some digging and researching before I finally found out what it was and where I could get it. The toolbar is called the Wibiya Toolbar.
What is Wibiya?


Wibiya enables blogs to integrate the most exciting services, applications and widgets of their choice into their blog through customized web-based toolbars.
Our platform offers a one-stop solution for integrating, managing and tracking third-party applications.Currently we offer a fixed set of tools such as creating a blog community via facebook connect,
enabling twitter alerts on your blog and enabling post navigation but there is a lot to wait for as we will be adding more and more application through time.
Wibiya Toolbar Features:
- Site search
- Translate
- Recent Posts
- Random Post
- Subscribe to RSS feed
- Share this post
- Facebook Community
- Facebook Fan Page
- Twitter Dashboard
- Notifications
- Photo Gallery
- Games
Wibiya is still in beta so you’ll need an invite to get in and if you don’t have one, you can request for an invite. I requested for an invite two weeks ago and got an invite two days after I sent my request.
Here’s how you configure and install the Wibiya Toolbar. When you get your invite, the first thing you need to do is login with the email address you used for requesting the invite and then provide the token or beta code sent to you by Wibiya. Next thing you need to do is to setup and configure your toolbar and you can do that via the Edit Toolbar section. (screenshot below)
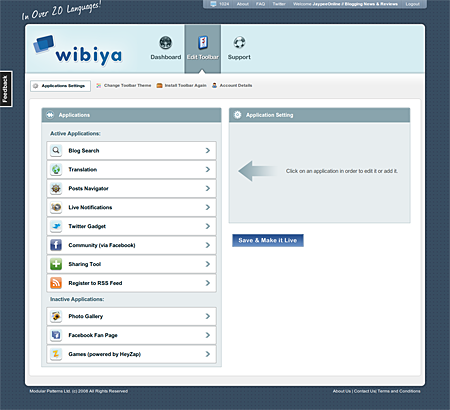
Select the Applications that you want to be installed on your toolbar. When you’re done selecting the applications, click on Save & Make it Live and you’ll be brought to the next part which is the Edit Toolbar > Change Toolbar Theme section where you’ll be asked to select your toolbar’s theme (color scheme). (screenshot below)
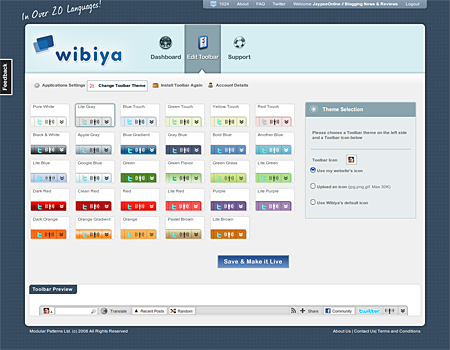
After you’ve selected a theme, click again on the Save & Make it Live button. You’ll be brought to the Install Toolbar section. (screenshot below)
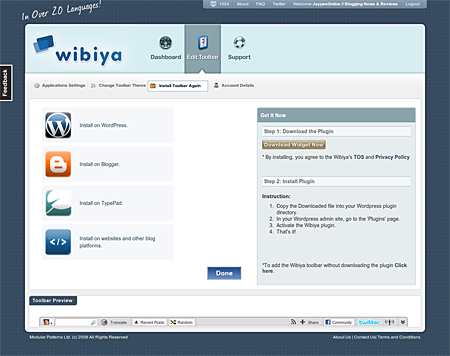
There are 4 options – Install on WordPress (widget), Install on Blogger (widget), Install on TypePad (code) and Install on websites or other blog platforms (code). Since I don’t use widgets, I chose the latter and inserted a line of code before the


I’m already using this on my job site Job Philippines but I’m not sure if I can use it on my blogs with Adsense ads on it. But as I can see you also have Adsense and Wibiya toolbar for a long time and I think there are no problems using both. Thanks for posting this topic Jaypee!
I applied it on my blog and it’s very useful :D
You failed to disclose that there is NO WordPress widget, They do not supply a path I.D which is needed to complete configuration and you cannot paste the code if you are using wordpress because there is suppose to be a widget!
Where is the widget? There is NO widget!
Where is the path I.D?
They do not supply it which makes the whole experience a major hassle.
Shame
where’s the toolbar? thinking about installing it, can you share why you took yours down?
Why did you remove the toolbar?
Already put wibiya on my blog and its really nice bro. Thanks
Hello,
can you send me an invite?
I requested invite few weeks ago and still didn’t got it.
thank you if you will!
Wibiya looks cool. But I am using Google Translate. Have posted a detail post as how to use it in my blog.
this really a great tool i like this
Comprehensive article.. I’m going to install it on expertcore.org now thanks to you.
Best Regards,
Neo
Hi, everyboby. I like this toolbar very much.
But I haven’t any invite. Can U share it.
My email: jokerhuapro[at]yahoo[dot]com
Thanks alot!
wibiya toolbar is the best!
@cah ndeso – Thank you! Glad you liked it. You’re welcome and its my pleasure to be a part of your blogroll. :)
very-very interest article. I like it. Thank’s for this. And i will to add Jaypeeonline on my Blogroll. And I hope you accept my wishes. Regard
@BLESS13 – Thanks! Glad you like it.
Are you asking about the plugin that displays “Share the Wealth”? Its called SexyBookmarks. You can get it here.
Great post, very useful….
hey im interested in this SHARE THIS plugin, but i dont know what is the name of this plug, can you tell me the name of the plugin please?, if you can, please write me to my Gmail…
Thank You!
@DiTesco – Its all good man. Btw, have you created a Fan Page already? If you have, the ID is the numbers that follow the name of your blog/fan page.
For example my Facebook fan page link is – http://www.facebook.com/pages/JaypeeOnline-Blogging-News-Reviews/115864051574. The ID is 115864051574. That’s the number that you need to provide in the Wibiya dashboard in order to activate/install your Facebook Fan Page into the toolbar. Hope that helps. :)
Hi Jaypee. I am not an FB savvy user and I am having trouble locating the ID. You see I have a vanity domain on FB and I have tried putting in the ID on Wibiya but it seems to be showing the same problem, although in the preview part it appears to be ok. Any ideas?
@mark – It depends for each blog/user. I got mine a couple days after I sent a request. Did you request for a invitation code too?
hoW loNg will they SEnd the token?
@DiTesco – You’re welcome! Btw, I just checked the toolbar on your blog and the Facebook Fan Page is still not working. When I click on it, it brings me to the main page of Facebook and not your blog’s fan page. You need to set it up from Wibiya’s dashboard and provide your fan page ID.
@aldrin – Same here. I mean, who doesn’t? The Wibiya toolbar is not only functional but also very effective. :)
Hi. Thanks for letting me now that there was a problem on the toolbar. I have edited it and I think it now works well. Have a nice day.
@jaypee, yeah i swear… I'm enjoying that toolbar on my blog.
@Ambo – You’re welcome! Glad to know that you were able to fix it and have it working on your blog. Good job bro! :D
Thanks Jaypee! I already fixed the problem and now am using it again! Great plugin!
@DiTesco – Glad to hear that. I checked it out as soon as I read your comment. Yup, the toolbar definitely looks good on your blog. Btw, I tried accessing the Facebook Fan Page but what I get is the main page for Facebook. I think you need to fix it. :)
Hi there. I was just checking me email and found that the invite just arrived. I have installed it already and it all looks good. We’ll see how this works for me. Thanks.
@Loy – Distracting? Hmm..you can “minimize” the toolbar by clicking on the arrow icon on the far right end of the toolbar. Its not distracting anymore when the toolbar is “minimized”. ;)
It’s useful but it can be distracting at times. :-) But I guess that it’s very necessary for some blogs, i.e. technology blogs like yours.
@DiTesco – That’s quite an ingenious way of finding out info about the toolbar! I just learned a new trick right there. Really? You haven’t received an invite yet? Sorry to hear bout that. Maybe you just have to try again?
Anyways, thanks for the kind compliments and hope you get your invite soon so you can have the Wibiya toolbar on your blog too. :D
Ironic, lol. I actually noticed this toolbar here on your blog and found out about by paying attention to the status bar when things where loading (hehehe). After discovering it, I visited their website and signed up for an invite and up to date I have not yet been lucky.
Which reminds me, they are a company from Israel. I hope nobody attempts to terrorize blogs who have it installed, lol.
Anyway, this is a great tutorial and I will certainly make use of it as soon as I am able to. Kudos
@K – Hehe, yeah I know you missed that paragraph. Its all good man. ;)
Btw, did you request for an invite from Wibiya?
@Ambo – Really? I didn’t have any problems with the toolbar except for the z-index issue which I was able to fix after publishing this post. Exactly what kind of problems/issues did you have? Let me know so we can try to fix it. ;)
Feck. I missed reading this paragraph. Understood.
@joie – Hehe..you really know me well and it also shows that you’re a regular reader here on my blog. Thanks for the compliment! :D
I removed it after testing the plugin on my blog. It’s not working well with Mozilla and Chrome. It works best with IE. I don’t know with other users. Just wondering if others experienced the same thing. Your toolbar JP is working well the last time i saw it. I love the plugin but i don’t know how to fix it. :-(
I’ve noticed it too. I did not bother to comment about it because I know you are going to give us the complete details of that nice toolbar. That what makes this site interesting. Nice bai.
@aldrin – Really? Cool! So how do you like it so far? Do you plan on keeping the Wibiya toolbar on your blog? :)
@Jhay – Really? You get annoyed by this toolbar? How? Personally, I also don’t like toolbars but when I saw this toolbar, it was different. It was love at first sight. Hehe :D
It’s another nifty thing to have. Though sometimes, I get annoyed by it. But it’s just me. ;)
yeah, this is cool. I've been running it on my blog as well. I think I first saw it here… ;)
@K – Not only cool but very helpful and useful for readers too. You missed the line where I mentioned about it being in beta and that it requires an invite code to get in. You can request for an invite if you want. ;)
This is cool. Do I need to sign-up to get an invitation or it is a ready plugin download?